
Providing the IP authorization details
After completing the prescreen evaluation, provide IP authorization request details on the Authorization Details page.
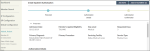
When the Authorization Details page opens, you see the prescreen section where there is a collapsible dash indicating entries to view (see image below). You might see an entry for Requested Days that you did not make. This entry is configured by the payee and is displayed automatically when criteria are met.
If you need to edit something in the Prescreen section, you have to go back to the Prescreen page to enter the change. Select Back to Prescreen. After any change, prescreen runs again when you select Next to determine whether authorization is required.
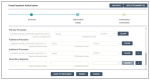
Complete the authorization details fields in the rest of the Authorization Details page.
While filling in the authorization details, if you return to the Prescreen page before you select Submit, but make no changes to the entries, you can return to Authorization Details without any loss of data. The entries you made remain intact.
To provide authorization details:
1. From the Admission Type menu, select the type of admission being requested.
2. From the Admission Source menu, select the admission source.
3. From the Place of Service menu, select the type of facility in which the service will be performed.
4. Enter the target discharge date in the format mm/dd/yyyy or use the date picker.
Depending on the configuration set by the payer, this field may be required or optional.
5. From the Level of Urgency list, select the urgency level.
If Urgency Definition is available, select it to see your organization's guidance on choosing urgency levels.
Your organization may require an attestation (acknowledgement that the selection is in compliance with the urgency definition). If so, an attestation window will display. Select Yes to attest. If you select No, TruCare ProAuth will revert your selection to your organization's configured value or back to blank.
6. From the Out of Network Reason menu, select the reason for requesting a facility that is out of network.
7. Specify the requesting provider:
a. Enter a minimum of two non-wildcard characters in the Search by Provider name or Search by Provider NPI.
The requesting provider is the entity that is requesting/ordering the service or admission for a member.
By default, searches include only providers associated with your user account. You might have the option to search all available providers by selecting Search All Providers. When using the Search All Providers option, use precise criteria to get the best search results; only 50 data entries are shown per search.
b. Select Search.
If the characters you enter have a unique match, the fields are filled in automatically and you can skip the next step. Do an advanced search, if necessary.
c. Select the provider from the list.
8. In the Requesting Provider Contact Name field, enter the contact name specified by the provider.
9. Enter the requesting provider contact number for the authorization, including the country code and extension, if any.
10. Enter the requesting provider fax number, including the country code.
11. In the Servicing Provider Contact Name field, enter the contact name specified by the provider.
12. Enter the servicing provider contact number for the authorization, including the country code and extension, if any.
13. Enter the servicing provider fax number, including the country code.
14. Specify the primary procedure using the following steps:
a. Enter a minimum of two characters in the Search by Procedure name or Search by Code and select Search.
Use precise criteria to get the best search results; only 50 data entries are shown per search.
To refine your search, select Name contains or Name starts with, enter your new search term, then select Search.
If the characters you enter match a single record, the fields are filled in automatically and you can skip the next step.
b. Choose the correct record (procedure name, code, code set) in the search results, scrolling through the list if needed.
The code set includes the procedure coding schemes defined in TruCare.
If necessary, select Clear to start over.
You might see a message about a procedure code being expired. For more information about expired codes, see Expired diagnosis or procedure codes.
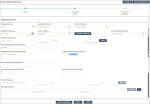
15. Specify a secondary procedure (or more than one) if needed, using the following steps:
a. Enter a minimum of two characters in the Search by Procedure name or Search by Code and select Search.
Use precise criteria to get the best search results; only 50 data entries are shown per search.
To refine your search, select Name contains or Name starts with, enter your new search term, then select Search.
If the characters you enter match a single record, the fields are filled in automatically and you can skip the next step.
b. Choose the correct record (procedure name, code, code set) in the search results, scrolling through the list if needed.
The code set includes the procedure coding schemes defined in TruCare.
If necessary, select Clear to start over (see image below).
You might see a message about a procedure code being expired. For more information about expired codes, see Expired diagnosis or procedure codes.
16. If you need to add a note or attachment, do so now.
See Adding notes and attachments to authorization requests for details.
If you try to submit the request without adding a required note or attachment, a message that a note or attachment is required appears on the screen.
17. If you need to add clinical criteria, do so now.
See Adding clinical criteria to authorization requests for details.
If you try to submit the request or navigate to the next page without adding required clinical criteria, messages that clinical criteria are required or optional appear on the screen.
18. Depending on your organization’s workflow, the standard inpatient workflow will allow Submit. Select Submit when you are ready to submit the authorization request. When configured, a message informs you that the authorization request has been submitted successfully. If the authorization has clinical criteria, a pop-up indicates that the authorization is being submitted.
It will close when the submission is complete. An authorization summary is displayed and includes the authorization number and status.
 The criteria status field appears only if clinical criteria are created for the authorization.
You can print a copy of the confirmation for your records. The confirmation prints to PDF using the browser print function. Return to member search or to the dashboard.
If your organization is using the inpatient comprehensive workflow, you can use the Procedure Prescreen when the inpatient admission includes procedures that will be performed during the inpatient stay. You can also click Next, which will navigate the workflow directly to the Review page if no procedures are planned or known.